Posts Tagged ‘Guitars’
3D – Acoustic Guitar
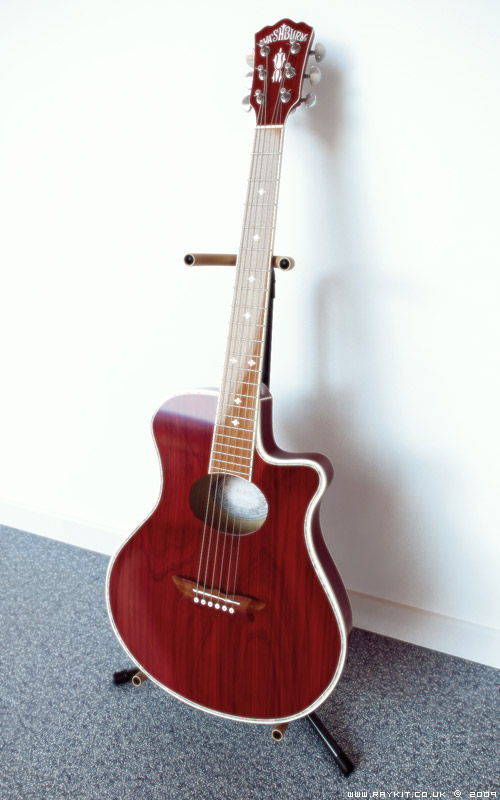
[Model: Washburn EA-18 Acoustic Guitar]
Here are the completed renders of my 3D acoustic guitar model. After modeling the guitar which you can view the WIP images here, I begun applying individual material to each part of the guitar and for most parts it only needed diffuse colour and reflection setting changing.
For the main parts of the guitar such as the neck and body, it needed UVW unwrapping in order to apply the wood texture and the edge binding correctly. The process for this part was removing the meshsmooth modifier first and unwrapping the model at its lower poly stage, then adding the meshsmooth back afterwards and rendering the UVW template.
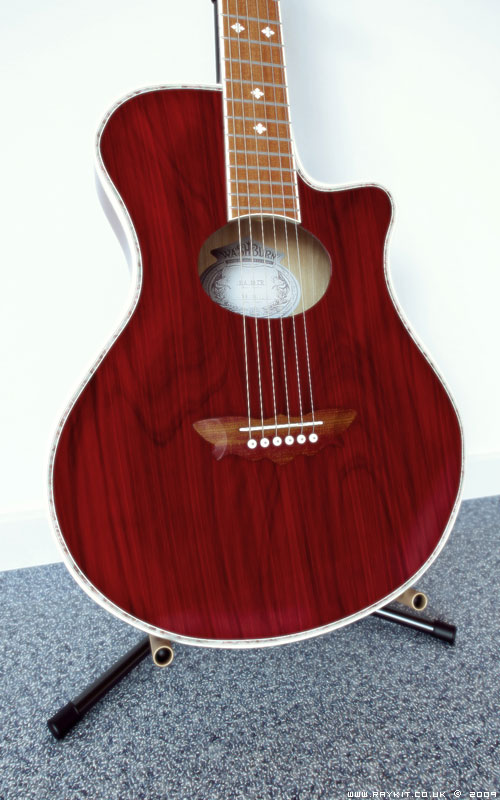
For the texturing, I used photoshop with stock images from cgtextures.com. The wood texture of the guitar were a combination of two layer of wood images that had different grains and combined together using the blending mode.
The logo detail and the branding sticker were photos I’ve took of my guitar and then incorporated into the texture.

The lights that were used in the scene were 1 vray dome light with HDRI, 1 vraylight, 1 spotlight and 1 omni light. The omni light helped bounce the light inside the hole of the guitar body and made the texture detail more visible.
A lot of time were spent experimenting with different HDRI to create the right look for the scene. As there was already a lot of wood texture on the guitar, I didn’t want to have wood texture on the floor as well, so I’d decided to go with blue carpet with a displacement map added to raise the fabric up alittle.

Certain areas of the scene were too bright and had washed away some of the details, so in the V-Ray setting, I’ve altered the colour mapping from Linear multiply to Reinhard which toned the brightness down and brought back the details in. This had also helped decreased the rendering time a fair bit.
Each rendered image took just over an hour to render at a much larger resolution. An ambient occlusion and depth of field map were also rendered for each image and incorporated in the post-production stage using Photoshop.

Overall, I’m pleased with the outcome of the renders. It was fun incorporating all the different materials in and seeing it react with the HDRI environment.
3D – Guitar Effects Pedal

[Model: BOSS CE-2 Chorus Guitar Effects Pedal]
Here is a couple of completed renders of the guitar pedal. The first render took around 1 and a half hours and the second took just over 2 hours at a larger resolution. The scene is made up of several spotlights and vraylights with the use of HDRI on the environment map.
I applied UVW Mapping to add the details in and added a bump map for the little dents. For the metal material on the control dials, I used a spiral gradient ramp on the reflection map to replicate the anisotropic metal finish.

Post production work was done in Photoshop to add more shadows with the aid of an ambient occlusion map and lens blur with the depth of field map.
Click here to see the WIP images of the pedal.
3D – Guitar Capo

[Model: Dunlop Trigger Guitar Capo]
Here is a completed scene of the guitar capo done using V-Ray renderer. The setup to this was a single target spotlight, standard V-Ray materials with a speckle on the gold metal and a wood surface texture taken from cgtextures. It took around 40 minutes to render the final image on a slightly higher resolution.
For the post-production stage, I have also rendered an ambient occlusion pass using Mental Ray renderer to futher enhance the shadows and a depth of field pass to create a realistic lens blur. These were later incoporated using Photoshop.
The image was sharpen up using the unsharped mask filter and altered the contrasts using the levels and saturation. To finish off, i’ve added a vignette filter to darken the surrounding corners, which helps focus the eye to the subject.
Click here to see the extra render passes.
Click here to see the WIP images of the capo model.
3D – Bass Guitar [WiP]
![3D Bass Guitar 1 [WiP]](http://raykit.co.uk/blog/images/raykitshum_3d_guitar_bass_1.jpg)
![3D Bass Guitar 2 [WiP]](http://raykit.co.uk/blog/images/raykitshum_3d_guitar_bass_2.jpg)
![3D Bass Guitar 3 [WiP]](http://raykit.co.uk/blog/images/raykitshum_3d_guitar_bass_3.jpg)
![3D Bass Guitar 4 [WiP]](http://raykit.co.uk/blog/images/raykitshum_3d_guitar_bass_4.jpg)
![3D Bass Guitar 5 [WiP]](http://raykit.co.uk/blog/images/raykitshum_3d_guitar_bass_5.jpg)
[Model: Rickenbacker 4003]
I’ve decided to complete my guitar model series with a bass guitar to round things off. Unfortunately since I don’t own this wonderful guitar I had to use lots of reference photos showing different angles to see all the small details.
The modeling for the bass guitar was slightly different to my other guitars that I’ve done since the head, neck and body are all in one piece, so I’ve modelled them as normal seperate objects and then connected them together at the end.
3D – Acoustic Guitar [WiP]
![3D Acoustic Guitar 1 [WiP]](http://raykit.co.uk/blog/images/raykitshum_3d_guitar_acoustic_1.jpg)
![3D Acoustic Guitar 2 [WiP]](http://raykit.co.uk/blog/images/raykitshum_3d_guitar_acoustic_2.jpg)
![3D Acoustic Guitar 3 [WiP]](http://raykit.co.uk/blog/images/raykitshum_3d_guitar_acoustic_3.jpg)
![3D Acoustic Guitar 4 [WiP]](http://raykit.co.uk/blog/images/raykitshum_3d_guitar_acoustic_4.jpg)
![3D Acoustic Guitar 5 [WiP]](http://raykit.co.uk/blog/images/raykitshum_3d_guitar_acoustic_5.jpg)
[Model: Washburn EA-18]
Since I’ve enjoyed modeling my electric guitar that much, I’ve decided to do my acoustic guitar as well using the same techniques and method I’ve learnt from the electric model.
It was much straight forward making the acoustic than the electric as it had less complicated geometry. The trickiest part again was joining the neck and head part together but by using my previous experience it became less time comsuming.
I’ve used some of the same objects from the electric like the screws to speed up the process a bit. The wooden structure on the interior of the guitar body was added to give that extra detail to the model.