Archive for the ‘Photography’ Category
Photography – Derbyshire
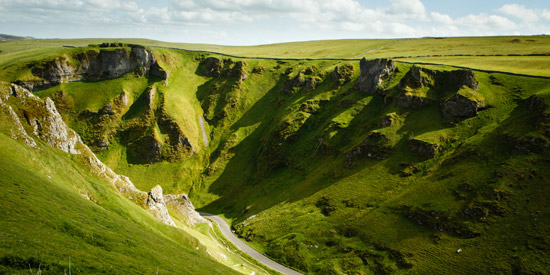
Winnats Pass, Derbyshire

Derwent Reservoir, Derbyshire
Here are some landscape photos of Derbyshire taken on a weekend in May. I went with my friend Kam and we set out on a mission to capture some nice landscape images for our own personal photography collection.
I took the 6D with me and a 24-70mm zoom lens as I knew I would be using a wider angle focal length for most of the day. We were fortunate to have a sunny day with some clouds which I liked as it added some dramatic interest in the skies.
We spent a few hours on top of Winnats Pass after climbing up (and me falling down) on the hilly areas. I focused on taking photos whereas my friend did some interesting time lapse videos of the clouds and the landscape on his mirrorless camera. I waited for the moment when the sun appeared off the clouds to add shadows in the rocks and grass which gave depth to the photos.
It was a good day out (even after the fall) and the photos turned out better than I had expected.
Photo Restoration – Slide to Digital


Here is a project that I did a few months ago for a family friend who wanted to be able to see his slides on his television screen.
There were over 1000 slides in total that he had taken in his travels around Europe with the earliest set taken from 1959.
All slides have been converted, cleaned and edited to its restored glory.
Click here to view a small selection of the restored photos.

The first task was to convert the slides to digital format, The simplest way would be to use a slide scanner but I had found some of them had low resolution and produces average results and the higher resolution scanners were more costly, I went with what was available and used a dSLR camera and a macro lens to capture the slides in all its details.
I created a makeshift lightbox by putting a video led light inside a box and placed a clear plastic sheet above.
After getting the camera equipment all setup, the first thing was to remove the plastic case and the 2 protective glass of each slide, this was a painstaking process but was required as the glass pieces had minute scratches and also when the 2 glass are pressed together it caused air bubbles.
The slide was then given a quick clean with an air blower and cloth and then placed onto the lightbox. Since the slide was so close to the macro lens; the camera found it difficult to focus and so it had to be manually (and meticulously) focused.
Once captured, it was put in to Adobe Lightroom where each slide was cropped and edited. Some of the slide had a slight red tint which caused purple skies in the image, this was easily fix by adjusting the temperature and tint in the white balance setting.
There were some vignetting that were visible from the original image, I used the Lens Correction setting to remove some of the dark corners.
I created a preset in Lightroom which helped speed up the editing process and then tweaked each slide individually.
After exporting the slides in Lightroom, the final processs was using the Spot Healing Brush Tool in Photoshop to remove the dust and dirt in the slides.
Dennis Cooper Photography – www.flickr.com/photos/denniscooper
Graphics – Logo Business Card Samples
I always wondered how my sample of logo designs would look on a professional business card but rather than getting them professionally printed (which would of been costly), I decided to take some photos of a blank card and superimpose the logos onto them.
![]()
I started by trying to find a nice quality card that I could use. After going though dozens of people’s business cards that had been given to my dad, I stumble a card that had a nice premium quality texture to it and conveniently had a blank side on the back.
![]()
I got the camera out and went around taking photos of the card on different surfaces. First thing I quickly realised was the camera couldn’t focus on the blank white card so every photo had to be manually focused. I had to move back and forth to find the right focus spot which was quite tricky as it was difficult to see on the viewfinder.
![]()
After several takes and finding the best photos I imported to Lightroom for some quick photo correction and then opened in Photoshop to add the logos in.
In Photoshop, I began transforming and scaling the logo to fit within the same perspective as the card in the photo, I aligned the logo transform box with each edges of the card and then placed in the middle with some minor adjustment by eye to make the logo look convincingly placed on the card.
![]()
I chosen Multiply on the blending mode of the logo layer to make the card texture show up underneath it. On some of the logos I also added a drop shadow to give it a fairly convincing emboss look.
The final piece to the overall look was adding some Gaussian Blur in the logo to match with the lens out of focus blur in the photos.
![]()
I’m pleased with how the photos turned out, it really helps visualise and showcase the logo designs in a real environment.
One thing that I would do differently would be to add a small temporary marker like a sticker in the centre of the blank card so that the camera can automatically focus onto the card, this can then be easily Stamp tool’ed out afterwards and save the hassle of manually focusing.
Photography – My Flickr Photo Albums

I’ve uploaded some of my favourite photos that I’ve taken over the years and placed them in separate albums in Flickr.
Most of the photos were taken in RAW and then processed in Lightroom.
I will be uploading new photos from time to time so please check back for new stuff!
https://www.flickr.com/photos/raykitshum
Quick Tip – Removing Dust from Photos
Here’s a quick and simple tip on how to remove large amount of dusts from scanned image photos in photoshop.

Close up: Before and After
I was scanning some old family photos and when I opened them up in photoshop to do some retouching, I noticed some were vastly covered in dust.
Perhaps a good tip would be to give them a quick brush to clear the dust before you scan, but if you’ve forgotten (like me) and can’t rescan again then here’s a easy solution that I’ve found which works well in certain situation; where the healing, patch or stamp tool aren’t ideal or would just take forever to do.
Note: This solution is basically painting in the dust with a similar coloured tone to the background and works effectively in a simple tonal value area, so outcome may vary!

Step by step:
1. Create a New Layer on top of the photo
2. Pick a colour similar to the tone around the dust, in the example you would choose a dark grey for the jacket
3. Paint the area covered in dust with a brush tool, you can freely brush in the area without dust as well.

4. Double click on this new layer to open up the Layer Style option > Blending Option.
5. Under the Blend If Option there is a Underlying Layer parameter, move the left pointer to the right. This will make the painted layer to only show up on the white coloured dust beneath. you can gauge where the pointer should be by looking at how it affects the image in the real time preview.

6. You may still find certain areas in the dust that doesn’t work as well, perhaps because it’s on a different background tone, in this case you would use the normal stamp tool to remove any other dust, but hopefully the majority would be disappeared using the blending option method.

Dust on, dust off!
That’s it, hope you found this helpful!