Archive for the ‘3D’ Category
Game – Prop Set #1
Here are a few more finished game props, these were all baked from a high poly version. Each prop took around 4-5 hours to texture. For presentation purposes; each model is displayed with 2048×2048 texture maps.

Fire Extinguisher – 422 tris

Barrel – 222 tris
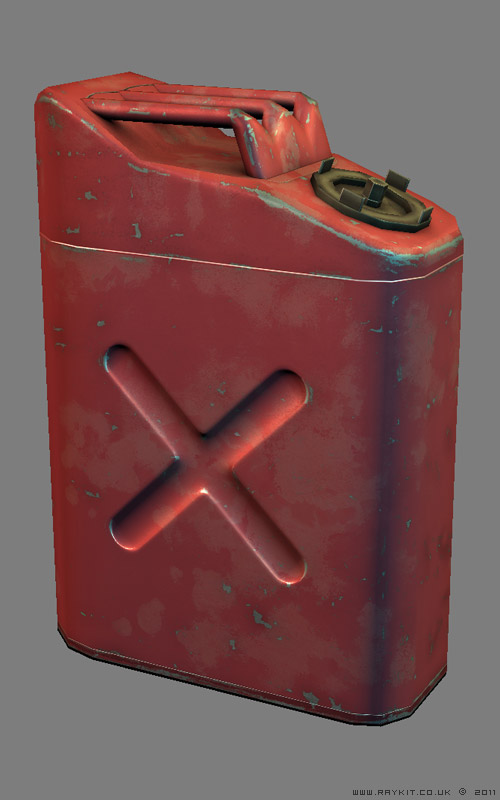
Gas Can – 300 tris
Game – Arcade Machine [Revised]

This is a new update of the arcade machine 3D model that was made awhile ago, the original model can be seen by clicking here.
The following improvements have been made:
– Improved the monitor screen on high poly to give depth and realism
– Improved edges on high poly for better baking
– Optimized low poly from original 932 tris down to 864 tris
– Added an electrical panel feature at the rear
– Optimized the uvw spaces in the texture map
– Added gloss map to give each material more distinct property
– Improved overall textures with added highlights
For texturing purposes and also for presentation; the final model uses 2048 maps but can be optimized to 1024 maps without losing much of its detail if it was to be used in an engine.
Game – Security Camera

Here’s a low poly game prop of a Security Camera, it contains only 338 tris and was baked from a high poly model.
Game – Retro Bar Stool
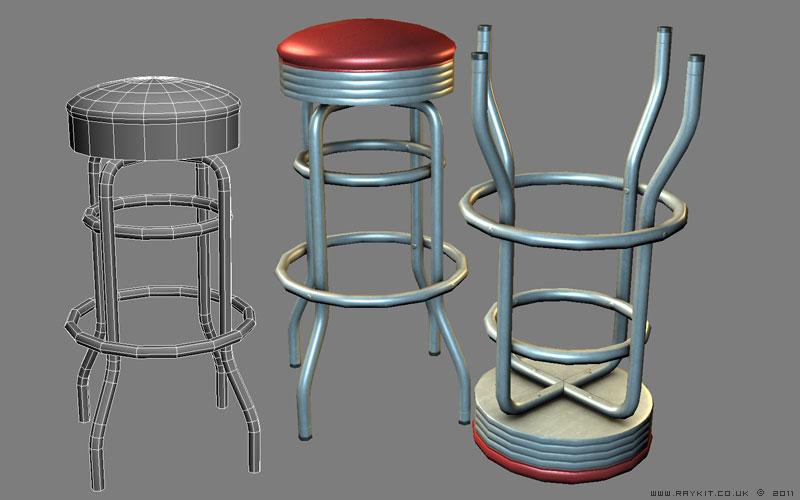
Here’s a 3D game model of a retro style bar stool. The low poly model contains 1202 tris, This was originally baked from a high poly model and optimized to a lower poly version while still retaining the curvature of the object.
3D – Bathroom Scene

Here is the finished 3D render of my bathroom scene.
The WIP image of this piece can be seen by clicking here. There were a few things that were missing in the original scene such as skirting boards and blinds which have now been incorporated along with some additional objects like the plants and the rug to add some finer details to the overall image.
I wanted to achieve a warm vibrant setting for the scene so I’ve went with earthy toned colours to give a natural look and feel.
I’ve added a Noise modifier on the rug and towels for uneven roughness but most of the overall appearance is achieved by the texture. I’d gathered a fabric image on the net and got rid of the seams using Photoshop offset filter so that it could be tiled seamlessly.
The leaves on the plant were simple plane geometries with a leaf texture applied to the material and using an alpha channel on the bitmap to hide the unnecessary outer part. In the render setting, I’ve ticked the force 2-sided box so that the leaf texture would appeared on both sides.
The longest time spent was dealing with the lighting of the scene, I’ve tried using different lights such as Omni and V-Ray dome lights but could not get the desired look. In the end I’d used Four V-Ray lights and a V-Ray Sun; Three of them were pointing in through the windows and one shining directly down from the ceiling. The V-Ray Sun created a natural light source and produced nice soft shadows.
I’ve used a V-Ray Physical Camera instead of the standard camera provided with 3Ds Max since it complimented well with the V-Ray lights and also had more settings to play with.
It took just over 5 hours to render the final image in larger resolution and 10-15 minutes each for the ambient occlusion and depth pass.
Photoshop was used for post production work. There were some odd noise issues with the pixels surrounding the edges of the windows which perhaps is caused from the Sun being overly bright, so I’ve painted back in the correctly toned colours.
I’ve added a backdrop in after the render instead of doing it in 3Ds Max as it was more easier to add in Photoshop and allowed more flexibility. I’d imported in my holiday photo as the scenery and used the alpha channel in the rendered image to have just the windows selected; I’d then added a layer mask on the photo layer and inverted it to show only the photo through the windows.
The final touches were adjustments in Levels, Curves and Photo Filter which added more contrasting tones.
I’m pleased with the outcome of the scene. I’ve paid particular attention to the placement of each object in order to try and achieve a nice balanced composition. I think the colours and the lighting set up used in the scene helped to achieve the warm ambient feel that I was going for.